Showing posts with label PC. Show all posts

Wednesday, August 26, 2009

Hexagon v3: Part 5 – Over clocking

This is a post about my new custom build PC. To see all posts, check out Hexagon v3: Part 1 – Main Components


Since Hexagon v3 is now working (Vista SP2 with all updates), it’s time to get started with over clocking. After all, this is just the process of using components outside their specification to save some money ;-).

As I said in a block post before, I want to over clock the CPU only. Therefore, I’m  concentrate on torturing and monitoring the CPU.

For torturing, I use a special program by Matthias Withopf: Core2MaxPerf (bottom of the page). This is the only program I know that is really able to fully load a Core CPU (yes, even Prime95 isn’t able to do so). For temperature monitoring I will use another tool from Mr. Withopf: CPUTempWatch together with SpeedFan by Alfredo Milani Comparetti.

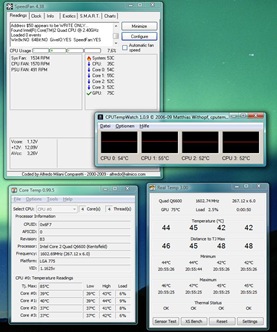
In case you are wondering why I use these two instead of Gigabytes’s EasyTune6: The “CPU Temperature” inside the BIOS and EasyTune6 is measured on the board and has nothing to do with the real temperature of your CPU. On the other hand, I know there are several other programs that claim to read the real temperature from the CPU directly. Well, here’s an example what you get (example from my old computer):
11_Core2_Temp_Muahahaha

Do you find the error on this picture? If so: That’s the reason why I trust only SpeedFan and CPUTempWatch.

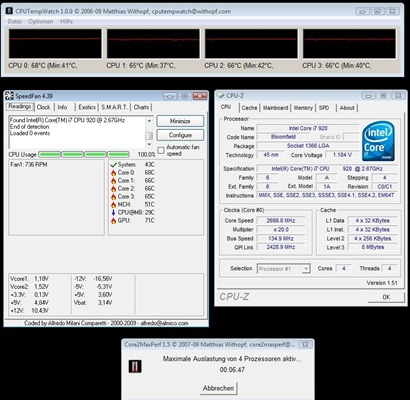
As I started testing with Core2MaxPerf and Prime95 (with all values AUTO, no over clocking), the somewhat expected happened: The system crashed. After some testing with various BIOS settings, it turned out that the memory modules were failing.

If the memory is configured to anything else than X.M.P. Memory (800 MHz/ 1600 MHz) with 1.65V voltage and the default timings (All values set to [AUTO] = 8-8-8-24), the system crashes. After that change, the system was stable.
12_MaxPerf_BeforeOC

Note: Actually I was running this for over an hour, but the print screen didn’t copied anything so I simply started Core2MaxPerf again and took the screenshot.

An 8 hours Prime95 stress test in Blend and In-place large FFT mode also worked, so I knew the system was stable and could start over clocking.


Given the crashes because of the memory modules, it was clear that the memory needs to be configured exactly as before or I would face crashes again. My initial goal was just above 3.0 GHz, so the base clock should be 151 MHz. However, this would cause the memory run outside the specification. Therefore, I created this small excel sheet to do the math:

13_OCCalc

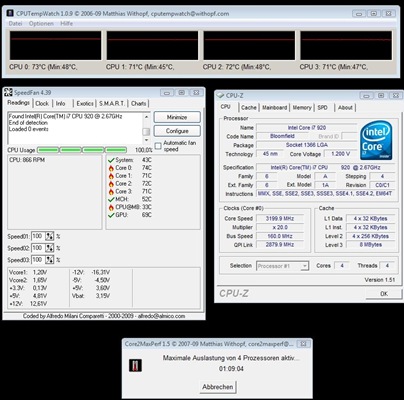
I ended up using 160 MHz as the back clock, x10 as the memory multiplier and x20 as the Uncore multiplier. This means that both the memory and the Uncore frequency are exactly the same as before and no bad things should happen there. I also raised the CPU vCore slightly to 1,275V and the QPI Voltage to 1,280V (to make sure it’s within a 0,5V range of the memory modules voltage).

Now I simply repeated all tests:
14_MaxPerf_OC

The temperature climbed to 73°C, which is okay for me (the CPU will shut down at 100°C) but the CPU fan management of the board is not as good as it could be.

If you use EasyTune6 and change the temperature control, the temperature is degreased to 69°C. That’s because the CPU cooler is than running at 1300 RPM while before it was only running at 800 RPM.

15_MaxPerdf_OC_Fancontrol

However, this would require having EasyTune6 running all the time and I don’t want that. Maybe I will later on try to control the CPU fan with SpeedFan to have more control over it.

The final test, Prime95 Blend for over 9 hours, worked as well:
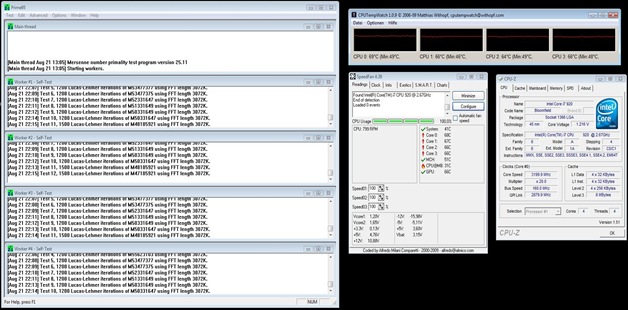
16_Prime95

Just for your reference: Although Prime95 was now running on all cores for more than 9 hours, the temperature wasn’t as high as with Core2MaxPerf. That’s what I meant with “Full Load Testing can only be done with Core2MaxPerf”.


Well, that’s it - I’m done with the setup of Hexagon v3. If just Windows 7 would be available already…
Friday, August 21, 2009

Hexagon v3: Part 4 – Full Assembly

This is a post about my new custom build PC. To see all posts, check out Hexagon v3: Part 1 – Main Components


The remaining assembly should be a peace of cake if you have at least build one PC in your life.

Install the CPU on the motherboard (this is described very good in the manual of the main board  and then install the Kabuto onto it. Using push pins with a cooler of this size can be tricky, but after watching the Kabuto installation video at Eiskaltmacher.de, this was a snap. You only need to make sure that the ends of the heat pipes are facing upwards!

When installing the memory modules, I did it (of course) wrong the first time. To enable triple channel operation, the modules must be installed into the white slots. Not the blue ones, although the memory modules are blue also.

When installing the hard disks, I noted each serial number of each drive and the SATA port it is connected to. Given how many screws you need to remove until you can exchange one, I though this would help in case of a hard disk failure.

I tried my best to do the cabling right this time, but the result is still somewhat… ugly.

08_Inlay_DSCF1453    07_CaseBack_DSCF1448

Anyway, the good news is: It came to life! So I simply installed Vista and did the typical Windows Update stuff.

Since this is the first time I’m using Samsung HDs (I mostly used Hitachi drives before), I went on to change the Automatic Acoustic Management (AAM). Hitachi usually delivery their drives set to Middle, so the drive is not operating at full speed in favor for more silence. Therefore I decided to set the Samsung HDs to Fast.

This can only be changed with ES Tool from DOS. Therefore, I downloaded “Driver Free Disk for BIOS Flashing” from Bootdisk.com, copied ES Tool onto the floppy and booted.

Important: ES Tool can only access the HDs when the Intel ICH is no responsible for the disk. In other words: When the drives are set to IDE and not configured as array. Even if a an array is already configured, you can always change the setting “ICH SATA Control Mode” to IDE and “SATA Port 0-3 Native Mode” to DISABLED, make the changes with ES Tool, and change it back again. The array will not be destroyed as long as you do not write any data on the disks.

Using ES Tool is simple: When you see the DOS prompt, type ESTOOL to start it. I will then display all drives it has found. Select the first, select “AAM Mode” from the menu, change the value to FAST and select PROCESS. That’s it. To select another drive, simply select AUTO DETECT and repeat.

By default, all HDs had AAM set to DISABLED and the actually results of this change where by far not as good as I hoped.

Here are the benchmarks before the change (AAM = DISABLED):

09a_DiskMark_AAM Off  10a_Sandra_AAM_Off

And here after the change (AAM = FAST):

09b_DiskMark_AAM_Fast 10b_Sandra_AAM_Fast

Once the access time was significantly improved, same values were even worse than before. As it seems, AAM set to DISABLED is nearly the same as FAST when using Samsung drives.

Saturday, August 15, 2009

Hexagon v3: Part 3 – Case Assembly

This is a post about my new custom build PC. To see all posts, check out Hexagon v3: Part 1 – Main Components 


Finally, all parts for Hexagon v3 have arrived. Time to get this rolling.

01_Standoff_DSCF1376Starting with the assembly, I first installed the standoffs for the motherboard into the case. While it’s empty, this is very easy to do. I used all available screw holes of the EX58-UD5, so at the end I installed nine standoffs.

Next was to completely disassembled the Twelve Hundred. As I said, I want to exchange all fans it has with the SilentWings ones.

02_CaseFans1_DSCF1384I started with the two case fans at the back. It’s a complete no brainer, you only need to remember to push out the two speed  switches from the back of the case.

A little bit more work is needed for the three drive bays. The problem is that the SilentWings use push pins and require a slightly bigger hole than the screws Antec uses. Left is the picture of the fan holder as delivered, on the right after the rework.

 03_DriveBay_B_DSCF139003_DriveBay_A_DSCF1388

04_DriveBay_SW1_DSCF141205_FanSpare_DSCF1417I only changed three holes, because one isn’t usable (speed controller knob) but three will keep the fan in place also. Once finished, I had four fan holders, three of them are for the front of the drive bays, one for the back (extra CPU cooling). Oh, and I also have five Antec TriCool spare fans now :-).

Assembling the drive bays again isn’t quite a problem. However, due to the size of the push pins the air filter needs some force to be installed again.

After that, I temporary installed the main board to get an idea how the cabling should be. Given that both the DVD drive and the floppy are installed with those ugly, old, wide and non flexible cables, I decided to install them at the bottom. That way, the cable aren’t going through the entire case.

06_Bottom_Front_DSCF1422Getting the floppy drive installed was the hardest part of the entire assembly. I spent nearly an hour to get it done right. To me, it looks like nobody at Antec has ever used that floppy spare. I ended up securing the adapter, as it chipped out somehow all the time, with the extra cover I installed for the power LED.

So the complete assignment of the bays is as follows (from the top):

  • 1-3: One drive bay with two HDs
  • 4-6: One drive bay with extra fan on the back (no HDs)
  • 7-9: One drive bay with two HDs
  • 10: extra cover with power LED
  • 11: Floppy
  • 12: DVD

Sunday, August 9, 2009

Hexagon v3: Part 2 – Case fans

This is a post about my new custom build PC. To see all posts, check out Hexagon v3: Part 1 – Main Components


When it comes to cooling, there are two characteristics that are mutually excluded. You want to fans to be silent, means you don’t hear them. On the other hand, your computer wants as much fresh air as it can get which means the fan should run at full power. And this causes noise.

The problem is based how fans work: An engine will spin a propeller that will blow fresh air to the area you need it. The higher the need of fresh air (air flow, measured in CFM – cubic feet per minute), the faster the propeller needs to spin. And this will simply cause more noise. An example might help:

A Silent Eagle SE 120mm (which is designed to be silent) run at 12 volts will spin at 1250 RPM (rounds per minute) and has a loudness of 1,1 Sone. This means: It has a loudness of “very calm talking”. You can hear it, but it’s not disturbing. The air flow of it is in this case 26 CFM.

If you now slow this fan down to 9 volts, it will spin with only 750 RPM and its loudness will go below 0.1 Sone. This means: It has a loudness of “calm breathing”, equals “You just can’t hear it” equals “Silence”. However, the air flow is reduced to 19 CFM.

To have the same air flow (CFM) as before, you would need two fans (38 CFM in total), but still completely silent.

To have a good air flow but also a silent operation, you should go for a fan that is running at low RPMs. To balance the reduced air flow, simply add more fans.

(I should add that an even better solution is to use a bigger fan, for example replacing a 120mm with a 200mm model. However, given how cases are build today, this isn’t an option. If the case expects a 120mm fan, you just can’t install a 200mm fan.)


That was also the reason why I choose the Antec Twelve Hundred as my case: It has three 120mm fans in front, two 120mm at the back and one 200mm fan on the top. The only problem with the fans that Antec delivers: You can only switch them between Low, Medium and High. Even when set to “Low”, the 120mm fans are running with 1200 rpm which is far too much for me. The 200mm fan on top of the case runs at “Low” 400 rpm (82 CFM) so this should not be a problem.

I know currently of exactly two fans that have a good airflow together with a silent operation:

image

be quiet! SilentWings USC 120mm (My number one choice)

Comes with 3-pin connector (not 4-pin for PMW!), 7V adapter to 4-pin Molex (7 volt, 900 RPM) and a 12V adapter to 4-pin Molex (12 volt, 1500 RPM). The fan case is decoupled, so vibrations will not cause more noise.

imageSharkoon Silent Eagle SE

Comes with several adapter cables :  "Standard": 4-pin to 4-pin PWM (color: white), "Low Noise" (black): 4-pin to 4-pin Molex 12V (1250 RPM), "Silent" (red): 4-pin to 4-pin Molex 9V (750 RPM) and "Ultra Silent" (blue): 4-pin to 4-pin Molex 7V (300 RPM).

I choose the SilentWings over the Silent Eagle SE for a simple reason: When run in silent mode (7V for the SilentWings, 9V for the Silent Eagle SE), the SilentWings is running at 900 RPM while the Silent Eagle SE is running at 750 RPM. This means that the SilentWings has a better air flow with more CFM.

 cooler3One more thing: When installing a fan, always make sure the install it in the right direction. Yes, I know this must sound odd but I also installed a fan in the wrong direction once. Simply have a look at the fan you want to install and check the arrows every fan has (click the picture to enlarge it).

This SilentWings has two arrows: The arrow on the left points to left and indicates that this is the direction the propeller is moving (in this case, to the left). The right arrow shows you in which direction the airflow is. In this case, the airflow will be bottom up, this means the fan will accelerate the air from the bottom to to the top.

Friday, July 17, 2009

Hexagon v3: Part 1 - Components

This is a post about my new custom build PC. See the other posts as well:

Part 1 – Main Components
Part 2 – Case fans
Part 3 – Case assembly
Part 4 – Full assembly
Part 5 – Over clocking


My custom PCs are always named HEXAGON or OCTAGON (that’s because there are some weeks where I use them both and Windows does not like equally named computers within the same network). Each new build gets an version number because I’m a programmer and I like version numbers :-).  I’m writing this on OCTAGON v2, so the new PC will be HEXAGON v3.

Hexagon v3 Main Components

image

CPU: Intel Core i7 920 (Bloomfield)

I like the features it has like the integrated memory controller (although this idea is stolen from AMD) with the triple channel interface. As it looks like, you can overclock the 920 very good so I hope I can each 3.2 GHz with it. I know that new Core i7 “Lynnfield” are on their way, but they will no longer have the triple channel for the memory.


image Main board: Gigabyte GA-EX58-UD4P 

UPDATE As it seems this is EOL, replaced with Gigabyte GA-EX58-UD5

X58 chipset (not that you have a choice for the i7…), with Intel Controller Hub v10 RAID (ICH10R). I plan to use RAID 1+0 (Mirroring and Stripping) and the ICH10R will allow me just that. Also, it comes with EasyTune a software normally designed to over clock from Windows but I want to use it to read the current temperatures, voltages etc. directly from the board. It has Dual Bios so if flashing the production BIOS fails, you can still access the board. Great if you were stupid enough to flash a board during a storm…


image CPU Cooler: Scythe Kabuto

A top blower cooler, which should help cooling the components around the CPU. With a 120mm fan and a airflow of about 74 CFM (cubic feet per minute) it should operate silent but also keep the CPU cool.


imagePSU: Cooler Master Silent Pro M600

Very silent, very good efficiency in low to medium workloads and very good protection against surges, bursts etc. Its 600 watts should be enough since I don’t plane to build a SLI system (two or more graphic cards). If you want build a pure gaming PC with SLI, there are better PSUs for that.


image Memory: Patriot Viper Series DDR3 6GB (3 x 2GB) PC3-12800 Low Latency DIMM Kit (PVT36G1600LLK)

It is on the list of supported memory modules from Gigabyte and DDR3-1600 MHz speed will give me enough bandwidth when I try to overclock the CPU. And if overclocking fails: They look good too.


image Hard disks: Samsung EcoGreen F2 HD103SI (four times)

932 GB is more than I need, but it’s good to know that I never ever get the “HD full” message again. Beside this, this is a 5400 rpm (rounds per minute) drive and still has a performance of 105-121 MB/sec. This looked to me like the ideal compromise between silent operation and good performance. The switch between slower/silent and faster/louder will be explained in a different post.


image Case: Antec Twelve Hundred

This case has three 120 mm fan on the front, two 120 mm on the back and a 200 mm fan on the top. This should allow a very good cooling and (with good fans) a very silent operation. If you think I choose it because of the “cool” blue fans it has: No, since I will replace all (except one) of them.