
Thursday, September 25, 2008
Wednesday, September 17, 2008
Windows Search Server (SharePoint): An unexpected error has occurred.
I have a sort of a „Love/Hate“ relationship with SharePoint. I like the product because I think it offers a lot you can do with it, but I hate it when it comes to troubleshooting.
This time, I have setup Windows Search Server 2008 and it works just perfectly on our site. I then gave the URL to somebody else from a different site and he only got An unexpected error has occurred. Great, here we go again.
The first thing is to turn on real error messages, not this stupid “Something went wrong, but I won’t tell you”.
To do so, open the web.config file for your site. For a default installation, this file will be located at C:\Inetpub\wwwroot\wss\VirtualDirectories\80. Open it in Notepad and search for customErrors mode="On". Replace it with customErrors mode="Off". To get more details, we will also turn on the call stack (in which procedure the error is actually happening). Search for CallStack=”false” and change it to CallStack="true" (this is in the SafeMode section).
Once we have done this, we were getting (somewhat) more detailed error messages:
Object reference not set to an instance of an object.
[NullReferenceException: Object reference not set to an instance of an object.] Microsoft.Office.Server.Search.WebControls.CoreResultsWebPart.OnLoad(EventArgs e) +94 System.Web.UI.Control.LoadRecursive() +65
On another machine we were getting this error:
Object reference not set to an instance of an object.
[NullReferenceException: Object reference not set to an instance of an object.] Microsoft.Office.Server.Administration.SqlSessionStateResolver.System.Web.IPartitionResolver.ResolvePartition(Object key) +77
The server was also now logs a lot of ASP.NET errors 1309 into the Application event log. Somehow I cam across a post from Chinmay Vartak showing the same error message (but for a different problem) and the steps he pointed out were the solution.
The problem was that on the remote site the name of the server was resolvable, but pointed to a wrong IP address. Although we were using a FQN (http://servername.site.acme.com instead of just http://servername) to access the server, internally WSS was not using the FQN but just the server name. So, all you need to do is to tell SharePoint to always use the FQN.
To do this, go to the Central Administration of the server and select Operations -> Alternate access mappings
 Click on Edit Public URLs and change the entry for Default to be a FQN and click on Save.
 In case you want to use SSL (https) also, you will need to create an entry for this also by using Add internal URLs and enter the https FQN URL for this server. When you have done this also, Alternate access mappings should show a list similar to this one:
 Now all this stupid errors should be gone and everyone can access your server with either http or https.
Enjoy!
Friday, September 12, 2008
SideBySide Event Log Error
Just came across a computer that was going havoc and displayed this funny error message in the system event log (Rough translation of the original version in German):
Dependend assembly "Microsoft.VC80.MFC” could not be found. “Last Error”: The references Assembly is not installed on this computer.
After search a little bit around, I finally found out that VC80 stand for Visual C++ 2005 (internally 8.0). And because Microsoft installs all newer Visual C++ runtime files as side by side assemblies into C:\WINDOWS\WinSXS, you don’t get the normal “DLL not found” but this message.
Well, the solution is easy: Just download and install the Visual C++ 2005 Redistributable Package from here
http://www.microsoft.com/downloads/details.aspx?familyid=200B2FD9-AE1A-4A14-984D-389C36F85647&displaylang=en
Please note that there is also a new package available (Visual C++ 2008 Redistributable Package) but this will install the files for Microsoft.VC90. Also note that you need to download and install the version that matches your computer. If you are using a 64bit Version of Windows, you will need to download the x64 version, not the x86 one I linked above.
And for your reference:
Visual C++ 2003 = Version 7.0
Visual C++ 2005 = Version 8.0
Visual C++ 2008 = Version 9.0
Thursday, September 4, 2008
Mozilla Firefox in "Jelly mode"
In case your are using a Netbook with an Solid-state drive (SSD), like the Asus EeePC 901, you will notice that Firefox 3 from time to time behaves like being in "jelly mode": it stops responding for a few seconds and simply freezes. Although this "jelly mode" will only last a few seconds, it will drive you mad if you try to use it for more than five minutes. Fortunately this can be fixed with some easy tricks and less than 10 minutes of time.
We got reports about this issue from several users of X-Setup Pro and they all asked us if there is a way to make Firefox faster and get rid of this jelly mode. Since we couldn't explain why this would happen, and we wanted to test X-Setup Pro on a netbook anyway, we bought a EeePC 901. After doing the typical "original setup, driver download and install, Windows Update check" procedure we installed Firefox 3.01 and within the first five minutes we were experiencing the jelly mode as well.
With the help of Process Monitor, DriveGLEAM, Wikipedia and mozillaZine we are pretty sure what this is causing. While using Firefox, it will perform a lot of small write operations to several SQlite databases (e.g. urlclassifier2.sqlite or places.sqlite) and other files like configuration files of add-ons or files for the cache. While this is fine with a normal HD, this causes a lot of stress for an SSD. SSDs are fast when reading data but very slow when writing. Although Firefox will only perform small write operations the SSD is not fast enough to perform this in time and causing Firefox to wait. And this is exactly what we are calling the "Firefox jelly mode".
The solution is quite simple: Move the Firefox profile (where all these write operations take place) to a location that is faster. But: The EeePC 901 only has two SSDs (C: and D:) plus an SD slot, meaning that there is no fast location available. This means, the only solution that is left is a RAM disk. The people at My Digital Life have written about this some weeks ago and made a package we can use right away.
Download the package and extract it to a folder on your HD (SSD), e.g. C:\ProgramFiles\RamDisk. From there, start RAMDISK.exe and click on the right on Install Ramdisk.
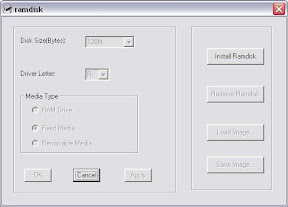
After a few seconds, the controls on the left will be selectable and we can choose which size this RAM disk should have. Since the 901 I'm using has 2 GB of memory, I selected 128M (128 MB) for size, if you netbook as only 1 GB, you might want to use 64 MB. All other settings (Drive: R:, Fixed Media) remain unchanged. Click OK and the program should report Success.
The next thing we need to do is to prepare the RAM disk, since it is currently set to use FAT instead of NTFS. Create a new Batch file in the same folder where RAMDISK.exe is located and name it Setup.bat. This batch will create some folders and save the image (with the folders) to the registry. Since we are using a RAM disk, rebooting the computer will wipe the entire contents of the R: drive. With the batch, we are creating an image of the drive and store it to the registry. When the computer is booted, the RAM disk is re-created from this image automatically.
@echo off
echo This will setup the RAM Disk
pause
format /FS:NTFS /Q /V:RamDisk /A:512 R:
chkdsk /L:2048 R:
CACLS R:\ /G Administrators:F
MKDIR R:\TEMP
MKDIR R:\FFCache
MKDIR R:\IECache
MKDIR R:\Stuff
rdutil R: registry
pause
Execute the batch. Press return to get things rolling, then enter RamDisk to confirm you want to format the R: drive, confirm the format again (Y) and once again (Y). If you now open Explorer, you should have an R: drive with several folder in it. Please note: If you ever change your mind about the size of the RAM disk and change it using RAMDisk.exe you need to execute this batch again!
Next, we need to create a profile in Firefox that will be stored on the RAM disk. Using Explorer, open R:, change to the folder Stuff and create a new folder named RamDiskProfile. Now open a command prompt (Start - Run - cmd.exe) and change to the path where Firefox is installed, e.g. cd "c:\program files\Mozilla Firefox". Execute firefox.exe -ProfileManager. Click on New profile and enter as name RamDiskProfile. As folder, select R:\Stuff\RamDiskProfile. Back in the profile selection, click Start Firefox.

If everything works as expected, you should see the Welcome to Firefox page. Notice: Do not, repeat, DO NOT copy your existing profile! At least on my 901, several files inside the profile had direct likes in it (e.g. C:\Documents and Settings\TeX HeX\...). If you simply copy your existing profile you will end up having some of the files will be written on the SSD again.
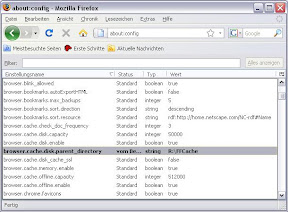
What we now need to do is to change the location where this Firefox profile will put the cache files to. In the address bar, type about:config and confirm the warning that appears. Right-click anywhere in the list and select New -> String. As name of the new value type browser.cache.disk.parent_directory. As value for it, type R:\FFCache. Close Firefox.
Now we will create a backup of this profile to the SSD. Use Start -> Run again and type %APPDATA%, which will display the folder where your personal data is normally saved. Open the folder Mozilla, then Firefox and then Profiles. Copy the folder R:\Stuff\RamDiskProfile there.
Okay, we are almost there. Create a new batch file that is used to start Firefox with the profile from the RAM disk. It will copy the files from the RamDiskProfile (from %APPDATA%) to the R: drive, wait for Firefox to exit (= you are done with browsing) and copy then any files that were changed back to %APPDATA%.
@echo off
echo.
echo Launching Firefox from RAM disk...
echo.
IF NOT EXIST R:\Stuff\RamDiskProfile\. mkdir R:\Stuff\RamDiskProfile
REM The xcopy command is one line until the "cd" command
xcopy "%APPDATA%\Mozilla\Firefox\Profiles\RamDiskProfile\*.*" "R:\Stuff\RamDiskProfile" /S /I /Y /H /Q
cd /D "R:\Stuff\RamDiskProfile"
attrib -a *.* /S
echo.
echo Firefox launched, this window will close when Firefox is closed
start /wait "Firefox from RAM disk" "%ProgramFiles%\Mozilla Firefox\firefox.exe" -profile R:\Stuff\RamDiskProfile
echo.
echo Copying files back from RAM disk...
REM The xcopy command is one line
xcopy "R:\Stuff\RamDiskProfile\*.*" "%APPDATA%\Mozilla\Firefox\Profiles\RamDiskProfile" /S /I /Y /H /Q /M
Now you also know why we have changed the location of the cache files earlier on: Because the cache files are now longer part of the profile (but instead on R:\FFCache), they don't need to be copied back. Of course, if you want to have your cache persistent, you can easily delete the browser.cache.disk.parent_directory from about:config and the cache files will be copied as well.
Start the batch file and give it a try, I'm pretty sure you will think you have just got a new computer. No more jelly mode, and the speed is what you were expecting from Firefox.
To verify that everything has worked, type about:cache into the address bar and look at the two cache directories, both should be pointing to R. One thing you need to keep in mind: In case you install an add-in or a theme, Firefox is offering to restart it with a single click. Don't do this since the batch will close when Firefox exists. Simply close it manually and restart it again using the batch.
Some other things you can do with the RAM disk: There is already a folder called TEMP so you can simply reconfigure your environment variables TEMP and TMP to use this folder. And finally, the folder IECache can be used to put the temporary internet files there.
Enjoy!
Subscribe to:
Posts (Atom)